Monday, December 12, 2011

101st Birthday!


Believe it or not, my husband's Aunt just celebrated her 101st birthday. Can you believe it? When she was born they had no electricity, no telephone or some of the luxuries we now consider essential. In her lifetime she has seen more inventions come to life and the world has transformed significantly. How amazing.

When she finished high school she went to the big city and went to business school. She started working in a law firm and shortly thereafter was assigned to work with a new lawyer. It turned out she worked for him throughout his entire career and he eventually became a Senator. When he died, she retired to her house and her garden which was always magnificent. She never married and she never learned to drive. She bought her house in 1950 on her own. In those days single women just didn't do things like that. She lived there without too much help until at the age of 99 she decided it was time to move into a retirement home and she is very happy there. Needless to say, she is the oldest resident. She has made many friends and she is still very physically and mentally active. Apparently she is the only resident who still goes outside with her walker and takes her walks around the grounds to keep mobile. I guess all those years of walking everywhere has paid off.

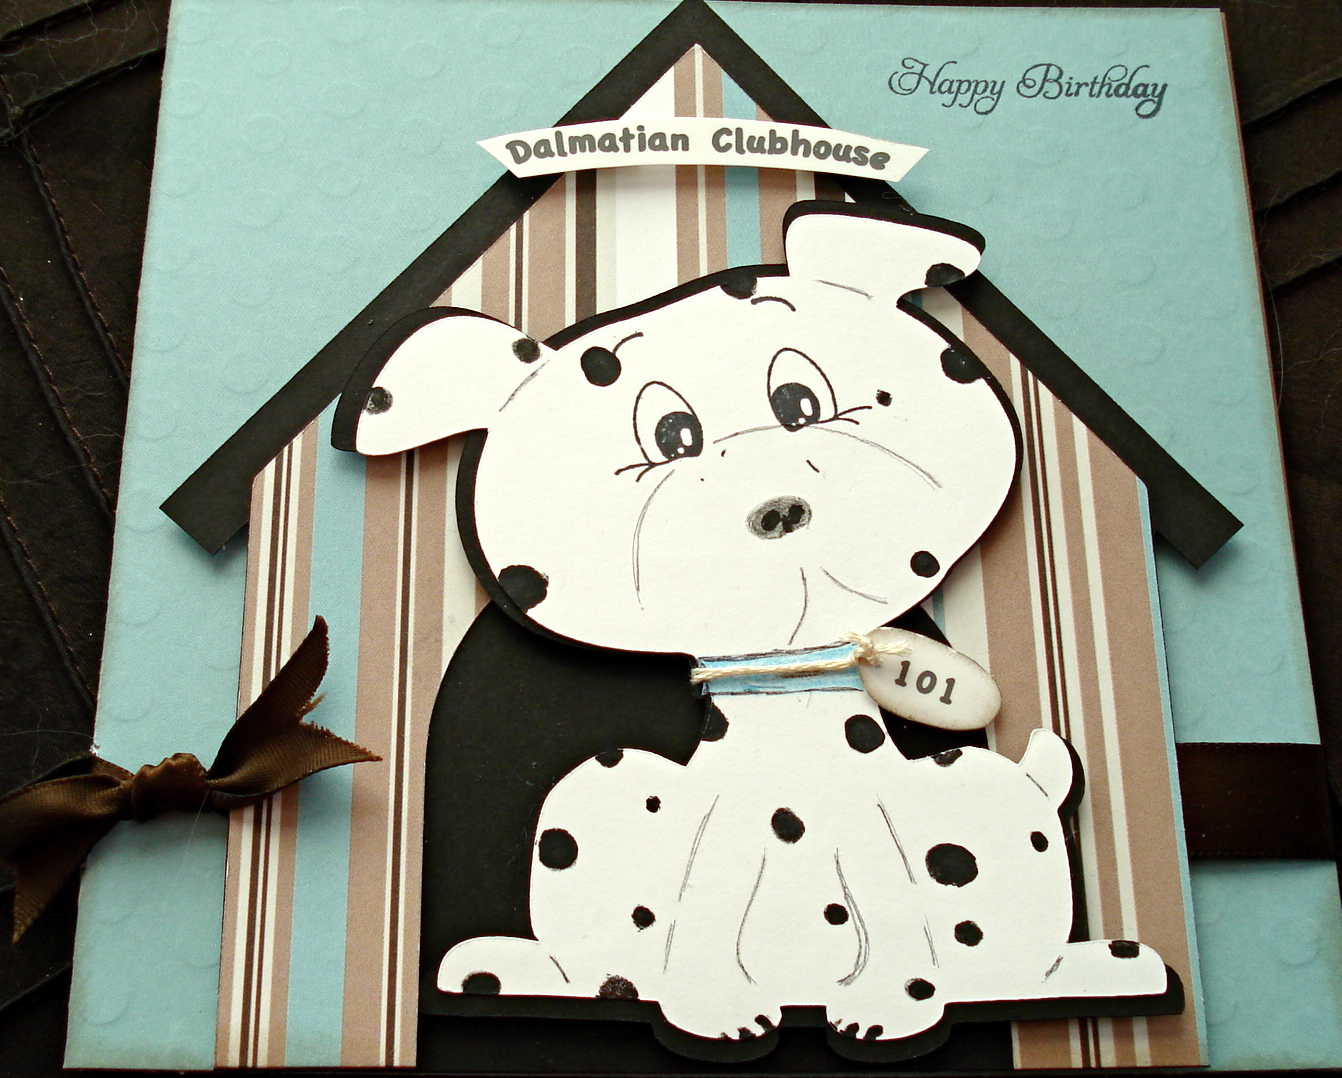
Anyway, for her birthday I couldn't help myself but make a card based on the 101 Dalmatian theme. I cut the dog house and dog from the Four Legged Friends Cricut cartridge and added a banner saying Dalmatian Clubhouse. I added the black spots on the bog myself and then added a tag with 101 on it. I used my Peachy Kean stamps for the eyes. A big brown satin ribbon finishes it off.

Last week we took the card to his Aunt and she absolutely loved the card. All of her other cards had flowers on them so this one really stands out. She absolutely loved it! We spent the afternoon with her talking about her house plants and all the things that are keeping her busy. We are looking forward to seeing her again at Christmas time.

Tuesday, December 6, 2011

Card Challenge - A Caroling We Will Go


Cricut Cardz Challenge this week is to make a card for Christmas based on your favorite Christmas song and use any Cricut cartridge you'd like. Well after some deliberation I decided upon the song, "Deck the Halls".

I started with a backdrop of black designer paper that would enhance the wreath. I cut several holly leaves and berries from the Stretch Your Imagination Cricut cartridge and arranged them in the shape of a wreath. I then shaded in the berries using my Copic markers and added Christmas green Stickles to the leaves. More sparkle was added with the green organza ribbon.

Now, let's see what your cards look like. Go over to Cricut Cardz Challenge and add your project for everyone to see. It's always interesting what other crafters are doing in their spare time. See you next time!

Monday, November 28, 2011

Christmas Tags


This weekend I spent time with friends in Michigan. As a small gift for everyone, I made boxes of gift tags.

I started by cutting several images using my Winter Frolic Cricut cartridge small enough to fit onto gift tags destined to fill the boxes. Each image was put together and Stickles glitter was added for fun. Red and green peppermint Baker's twine was threaded through the whole at the top and will be tied to each present for gift giving. I made 6 boxes and 6 different images so that each box contained 2 tags of each design - so 12 tags in each box.

It was a great project to get me into the Christmas spirit. Everyone loved getting a little something that was so unique and useful. Happy holidays!

Saturday, November 19, 2011

Let it Snow!


Kids just love playing outside so why not let it snow in the classroom too! I made these classroom bulletin board decorations for a friend of mind who teaches Grade 2 students. At the same time the Cricut Cardz Challenge this week is to create something using the letter "S" and any cartridge. I certainly made lots of "S" objects - snowman, snowflakes, snow, skater, sled and students.

I cut most of the images from my Winter Frolic Cricut cartridge. There are a lot of fun images to choose from. The snowflakes were cut using Martha Stewart's snowflake punch. I pressed the snowflakes in VersaMark ink and then sprinkled them with Stampin Stuff Winter Wonderland opaque glitter which I set using a heat embossing tool.

The mittens were made a bit larger and I cut these from the Designer's Calendar cartridge. In the classroom, students can earn a mitten each time they do something nice for someone else. It's hard to keep students motivated the month before Christmas and every little bit of fun to keep them on track is helpful. I know they will love them.

Why not head over to Cardz TV with Mary and enter your creation into the Cricut Cardz Challenge. Don't forget - it has to be something beginning with the letter "S" and using any cartridge. So go have some fun!

Sunday, November 6, 2011

Let's Give Thanks - Diamond Fold Card


The challenge this week at Cricut Cardz Challenge - Cardz TV with Mary is to make a card giving thanks. With the American Thanksgiving coming up in a couple of weeks, I thought I'd try something new. I've never made a diamond fold card but I thought I'd give it a whirl. I was very pleased with the results.

I started with some heavy weight patterned cardstock that I scored to enable the card to fold properly. I used my Martha Stewart score board which really made this task much easier and way more accurate. I then added some autumn designer paper from K & Company to the diamond shape as well as the side panels. Next I cut cornucopia and fruit images that I found on the Paper Doll Dress Up Cricut cartridge which became the focus of the card. I used my Copic markers to add shading and dimension to the basket and the fruit. The last thing I added was the simple sentiment - So Thankful.

We are all truly thankful and privileged for all we have!

Friday, October 28, 2011

Happy Halloween!


It's that time of year when we can get goofy and dress up in all sorts of strange outfits. Kids especially enjoy the excitement of going house to house to show off their costumes and to collect candy.

I made these shapes for a friend of mine who teaches Grade 2 to use as classroom decorations. The large tree was cut from the Stretch Your Imagination Cricut cartridge with some of the leaves were outlined with sparkly Stickles. The spider web also received sparkly Stickles after being cut from the Designer's Calendar Cricut cartridge. I found the cute butterflies on the Gypsy Wanderings Cricut cartridge and again added Stickles for shimmer. The ghost and skeleton shapes were cut using the Paper Dolls Cricut cartridge.

In addition, each student got their own pumpkin to decorate at school and add their name to it. This image came from the Wrap It Up Cricut cartridge.

Saturday, October 15, 2011

Baptism Card


You know Baptism cards can be tricky. They can either be very simple or they can be quite formal and in front of the entire congregation at the church. A friend asked if I could make her a Baptism card for a Greek Orthodox ceremony. Sure no problem.

I had to do some research on the internet before I started. I didn't want to make something inappropriate but I also had to recognize that this was a traditional religious ceremony that recognizes that the entire congregation is asked to accept the child as their own and everyone is asked to celebrate with the family. I knew that I had to incorporate a cross and the ones that I cut were from the Designer's Calendar Cricut cartridge. One cross was cut from baby blue cardstock and the other one was cut another cross a bit smaller in white cardstock, scored it using my Martha Stewart scoreboard horizontally and vertically. When I pressed the sides down, it gave the cross a 3D look. I then added dimensionals behind it and placed it on top of the blue cross The word "rejoice" was placed above the cross. This white layer was then added to the front of a 4 1/4" x 5 1/2" baby blue card.

To create the inside images, I first printed the blessing onto cardstock from my HP printer. Then using the "center point" button on my Cricut Expression machine, I cut around the blessing using my Lacy Labels Cricut cartridge. It came out perfectly! The baby booties were cut out from my Paper Doll Dressup Cricut Cartridge and mounted on baby blue cardstock. White satin ribbons were added and placed underneath the verse.

My friend really loved the card and I understand it was a very lovely ceremony.

Monday, October 3, 2011

Versatile Card


I first had the idea for this card after I saw these co-ordinating patterned papers. The first paper had a series of birds so I thought it would make a great wedding card as the birds seemed to appear in pairs. I then cut a single bird and had it appear in front of a birdcage which I cut from the Serenade Cricut cartridge and all were layered on the co-ordinating polka dot paper. Inside, the greeting was simply "Celebrate". A lime satin ribbon adds a bit of sophistication as does the pearl accent on the top of the birdcage.

The best part about this card is that it could be used as a wedding card, an anniversary card or really for any event. Now that's a plus. Enjoy your day!

Sunday, October 2, 2011

Honeymoon in Niagara Falls


Here's another wedding card that I made for a couple who were going to honeymoon in Niagara Falls. I started with a retro feel for the front of the card by using the word "forever". Inside, I had letters from the word L O V E tumbling down the waterfall.
Waves were added in two different blue tones and the canoe is riding the waves. Glitter was added for a lovely shine.

I thought this was a very cute card made especially for this couple. All the elements were cut from my Cricut cartridges. Hope you like it.

Thursday, September 29, 2011

September Wedding


With the weather still very warm, weddings continue to take place. Here's a wedding card that I made recently.

The bride had fuchsia in her bridal party so I added ribbon to both the card and envelope. The card a simple and tailored card using black and grey paper. The words "love" and "forever" appear on the front of the card together with a large flower medallion and fuchsia rhinestone centre. Another flower medallion adorns the black envelope along with strips of the black and grey paper used on the card. The card really turned out well and I will definately make this type of card again.

Friday, September 16, 2011

Baby Dear


I just love the pastel tartan designer paper from the Best of Brenda Walton by K&Company. I mounted that paper onto an ivory cardstock with a petite scalloped edge using one of Martha Stewart edge punches. I added a light raspberry strip at the bottom to bring out tall the pink tones in the pattern paper. The carriage was cut using the New arrivals Cricut cartridge which was added using foam dimensionals. A second carriage hood was embossed using the Swiss Dot folder and added with more dimensionals. A pink gross grain ribbon bow completes the look. Inside I have a large scrolled stamp that says, "Baby Dear".

I love the way the card looks, simple and soft with all the pastels tones. I hope you like it too.

Thursday, September 8, 2011

A BIG thanks from the "troupe"


My daughter works for a large corporation. Recently, one of their clients hosted an evening at the latest Cirque du Soleil show, Totem, which was absolutely awesome! To thank them, I made a very large card for everyone at her office to sign and present to the client.

Part of the show had jungle animals so my starting point was a jungle theme. I started by taking a large piece of foam core (about 24" square) and added paper supported by wooden skewers to represent the tent topper and flags were added to the sticks. Next I a cut a large tree which was the focal point of the show as well as this card. I embossed the trunk and added vines were added for the money's to swing on. The apes and monkeys were cut from the Animal Kingdom and Create a Critter Cricut cartridges. I created dimension by cutting just the faces and mounted them on pop dots. Grass was cut from the Stretch Your Imagination Cricut cartridge and curled to add texture. Finally designed paper was folded and added to the card to represent stage curtains. The caption at the top read thanks from the "troupe".

Everyone where my daughter works absolutely loved the card and gladly signed their name on tummy of their favorite animal. When she presented it to the client, they fell in love with it and said it was so thoughtful and imaginative.

I was so pleased that everyone liked it. It was really fun to make.

Friday, August 26, 2011

School Days


A friend of mine is going back to teaching primary school after taking a year off on maternity leave. She's not looking forward to leaving her daughter at day care so I thought I'd send her a card of encouragement.

I just love the blue letters that top the crisp white background and adhered to a black cardstock. I think the black really gives it a dramatic look. I then added the red apple which I added to the front of the card using pop dots. You can see inside of the card that the same apple appears with a bite out of it. It looks good enough to continue eating!

Anyway, to all the teachers both very new and seasoned individual who bring so much enthusiasm to the classroom - good luck on your first day and enjoy yourselves. You do a very important task at teaching youngsters how to socialize, behave when asked and guide them in their quest to learn. You are truly invaluable.


Wednesday, August 24, 2011

It's a Jungle Out There


This week's at Cricut Cards Challenge, we had to create a juvenile birthday card using an animal that you would find in a jungle. I chose the cute and playful elephant found on the New Arrivals Cricut cartridge. It has a round shape and looks like a small baby elephant which I thought was just right for this card. I cut the elephant using a pink paper which had a cute star burst design. I shaded portions of the elephant using my Copic markers and added googlie eyes and a hot pink bow. Perfect for that little girl who will receive the card.

What would an elephant need nearby but a cute palm tree so she can stretch her back and trunk. The palm tree was cut using the Cricut Create a Critter cartridge. I think the foliage looks very realistic after embossing it.

Both the elephant and the palm tree were mounted on a background made up of a torn piece of cardstock on top of a turquoise base. And a simple "birthday wishes" is stamped nearby.

Come and join us for this challenge and let's see what jungle creature you can bring to life on a child's birthday card. See you later alligator!


Friday, August 12, 2011

I did it!!!


I finally bought myself a Gypsy!!! I know what you're thinking..."what took her so long". My thoughts exactly. I guess it was the price and then I thought it was duplicating the equipment I already had. I bought the Design Studio software two years ago and never had much luck with it. After numerous calls to the support line and not really getting anywhere except for them to say that it was one of the older programs. I also thought that working on a computer screen would be easier for viewing than working on a small Gypsey screen.

On Thursday I was in a WalMart and they had numerous scrapbooking products on sale. To my surprise there was a brand new Gypsey at such a reasonable price, I just couldn't resist. Last night I ran the updates and today I loaded all my cartridges. I went on the Creations with Christina website and watched her series on getting to know and using your Gypsey. She explained all the features perfectly - thanks Christina. After that, I went to my craft room where I stayed all day and created some lovely projects in record time.

What I like most about the Gypsey is that I can see exactly where on the mat the image will cut and whether it will cut down or across the mat. That way, I can save making multiple cuts to get my image. I place the paper in the proper location and cut. I haven't tried welding yet but I don't think that will cause me any problems.

I don't know why I waited so long to get this fabulous creative tool. I am enjoying every minute!!!

Saturday, August 6, 2011

I've Been Away in Ireland


Well. It's been a while since my last blog but I have a very good reason. I have been away in Ireland. My sister and I had a chance to visit to the country where my Mother was born. The church in Dublin where she was baptised still stands and it was our intention to visit it and then travel to Clonikilty, a small town on the picturesque southern coast of Ireland to attend a wedding.

Our adventure started off with problems at the airport. It was a good thing that we got to the airport early and checked in. Apparently the airline changed planes due to mechanical difficulty and they re-seated all the passengers. My sister and I had paid for preferred seating but when the airline reassigned the seating in the smaller plane, she got the preferred seating but I was assigned to the back in regular seats. We also checked our seat assignment on the return flight and once again, we were not going to be seated together but instead we would be "near" each other. Great! Something to look forward to. The only good thing was that I might get a refund for the extra charge on my preferred seat but the down side was that I would be sitting in steerage so who knows if I'll be able to sleep...despite the neck roll, blanket, eye shades and ear plugs!

When we were finally able to get on the plane, a very nice man changed seats with me...if you can imagine...and let me sit with my sister. What an unselfish act of kindness that we really appreciated.

After arriving in Dublin, we found our downtown hotel quickly before heading out to explore the city. I have travelled in numerous cities but I must say that Dublin is on my list of favourites along with San Fransisco, Barcelona and Buenas Ares. It is very pedestrian friendly and charming. We used the hop-on hop-off bus service which was invaluable and with tickets valid for for two days, it was worth every penny.

Finally we found the church where my Mom was baptised. It is located in the heart of the city near Trinity College. We went inside this lovely old church, lit a candle for my Mom and said a prayer for her. She died some years ago and never had a chance to revisit the country of her birth.

More about my trip on another installment.

Wednesday, June 29, 2011

Let's have a BBQ!


When I saw this denim looking paper, I knew I wanted to make something different. Why not an invitation that looks like a pocket shirt pocket with an invitation inside.

I started by cutting out the shape of a shirt pocket and lining it using a different paper. White edge stitching completes the look. Then for the invitation...I started off cutting images from the From My Kitchen Cricut cartridge that I added after printing the text on my computer. I made a pull tab from red gross grain ribbon and added it with a bronze paper fastener. I think the invitation looks very countrified (if there is such a word)!

Now let's see if you can make a project with a picnic theme using any any Cricut cartridge. You can enter your projects on the Cricuts Cardz Challenge for this week and possibly win a prize. See you later...ya'll.

Sunday, June 26, 2011

New Baby


I've been so busy with various projects that I'm afraid I have neglected my blog a bit.

My sister's only son (and my only nephew) and his wife who live in Richmond, Virginia recently had a baby girl. I wanted to make a very special baby gift. We haven't had a baby in our family for over 18 years so we need to embrace this event. I made this birth announcement which I machine embroidered which looks lovelier than the photo. I was extremely pleased with how it turned out and anyone who has seen it, absolutely loves it. When I took the photo I didn't include the details of the frame. Too bad 'cause it would have shown two tones of wood which added to it's charm. The dark wood matches the nursery crib and dresser perfectly.

It doesn't matter what you do whether it is making cards, scrapbooking or embroidery so long as you enjoy yourself. I love what I do no matter what craft I choose.

Wednesday, June 1, 2011

Bow Wow Greetings


Here is a general card that can be used for anything. I made this card in response to the Cricut Cardz Challenge this week that asked us to make a card using any cartridge and any theme.

I started out with some medium brown embossed specialty paper from K&Company. I rubbed a sanding block over the surface of the paper which exposed the lighter coloured paper underneath. The dog was cut using my cartridge - Four Legged Friends. Cream embroidery thread is the same colour as the background paper and was strung underneath the words, Bow wow. The card was really fun to make. You can really have fun using various patterned paper and colours for the dog's body. Anyway, here it is - the card for this week's challenge. Come one over and join us at Cricut Cardz Challenge and show us your cards. Thanks.

Tuesday, May 31, 2011

Special Birthday for a Special Lady


My mother-in-law celebrated her 80th birthday last week. My husband, being her eldest child, and his father got together and planned a lovely dinner for immediate family and close friends. It turned out to be a lovely evening and we had cocktails, snacks and shared great conversation with relatives and friends. A house had been converted to an intimate little restaurant with front patio and large principal rooms on both floors. We had the entire upstairs to ourselves. Entreees ranged from osso bucco and sea bass to risotto and a lovely home made pasta. Everyone had a great time. It was a lovely event for a fabulous person. I couldn't ask for a better mother-in-law.

The card I made was inspired by the chocolate and pink polka dot gross grain ribbon. The "80" sparkle stickers were added to organza ribbon. I cut the black and white label from nestabilities dies. The Happy Birthday stamp is from PaperTrey Ink. Everyone loved the card and I had great fun making it.

Monday, May 16, 2011

Masculine Birthday Card


Making cards for guys whether they are men or just small boys can be challenging. One way to get your ideas moving in the right direction is to give yourself a challenge...just like the one that Cricut Cardz Challenge is posting this week as their Challenge #75.

We were asked to make a card using something with wheels. I looked through all my cartridges and to my surprise there were several that would work. However, I chose my Just Because cartridge. The main image is a pick up truck but one of the options is the ability to cut a sticker which can be made up of a circle with some of the pick up truck displayed. You can cut a circle backing for the sticker but I chose instead to display the blue truck on an embossed background. The sentiment of Happy Wishes was added to replace the tire.

I think this card successfully answered the Cricut Cardz Challenge. Why not drive over to their website and see what other crafters have come up with. It might give you some ideas for future cards. Happy crafting!

Wednesday, May 4, 2011

To the Beach We Go


I know what you're thinking...that's it's a little early for beach talk but the themed challenge this week at Cricut Cardz Challenge is to make a card relating the beach.

I knew immediately that I wanted to make a card that showed water. I chose a light blue cardstock that I embossed using a swirl folder which I passed it through my Cuttlebug. I took a blue Momento petal ink cartridge and rubbed it over the swirls to add dimension. I also applied some Martha Stewart ice blue glitter to some of the "waves". The whale was cut using my Create a Critter cartridge out of a darker blue card stock. White gel pen was added to create a bit of dimension. Of course I added a bit of glitter to his water spout. The word "splash" was also cut from the Create a Critter cartridge. Blue organza ribbon completes the card.

I think the card really turned out to be a cute one. We can go to the beach and see our own water creatures but I would recommend that we wait until the weather is a bit warmer. Keep on crafting 'til then!

Monday, April 18, 2011

Mother's Day Card Challenge


It's been a while I know since my last blog. That's because I've been leading a very busy life. That's what Mother's do, don't they. They put their own things aside until everyone else is looked after...then do something for themselves. I'm not saying that this is the right way to carry on, but it happens. Right now I'm helping my grandson with his college courses and trying to get him into the program that he wants. I also work part time 3 days a week at a local quilt shop (love it), volunteering at a large hospital Emergency Department once a week (absolutely love it). trying to finish a quilt, as well as caring for my husband, cat and tropical fish. That doesn't include cleaning, getting ready for Easter, readying myself for a trip to San Fransisco next month...the list goes on.

I did take time out of my week to make a card in celebration of Mother's Day. I had some lovely patterned paper that I cut out as the background. I used my Martha Stewart scoring mat on some lovely raspberry tinted paper and made the large accordion flower. I took the same designer paper and using my Create A Critter cartridge, cut out several flowers . The lovely blush organza bow adds softness to the card. A simple script Happy Mother's Day stamp from Papertrey Ink finishes the card.

Please join us at Cricut Cardz Challenge for their Challenge #71 and make a Mother's Day card using any cartridge you'd like. We'd love to see your project posted on their blog. You even have a chance to win a prize. Thanks and enjoy your week!

Wednesday, March 23, 2011

Is it Spring Yet?


Well for those at Cricut Cardz Challenge it is. With Spring being right around the corner, I think, the challenge this week is to make a card for Spring using only pink, green and white ONLY but you can use any cartridge you'd like.

I checked out my Create a Critter cartridge and found a sweet little chick and egg which I thought was cute. I have a lovely piece of light green paper with pink and green flowers and leaves on it. Wasn't that lucky! I cut the cracked egg in pink and the little chick out of white. Green beak and tummy complete the image. Then I thought about the caption. The words "ta da" add a cute factor. I hope you like it.

Why not go over to Cricut Cardz Challenge and see what other members of my team came up with.

Thursday, February 24, 2011

St. Patrick's Day


When you think of St. Patrick's Day, the image that comes to mind is a shamrock. Well the challenge this week at Cricut Cardz Challenge is to make a card using any Cricut cartridge but NO SHAMROCKS!

I put my creative cap on and came up with this card. I started with the hand cut from the Designers' Calendar Cricut cartridge and added a lime green bow to serve as a reminder to everyone to wear green. I then used my Plantin Schoolbook Cricut cartridge to cut a banner out of black cardstock with the words "wear GREEN on 17" which I then mounted on lime green background paper. Green bling was added to give a feminine touch to the wrist.

I noticed that most of my other team mates at CCC used the Irish leprechan in their projucts but I tried to do something a little different. I hope you get some inspiration from my efforts not follow the typical rainbow to the pot of gold.

Wednesday, February 9, 2011

Valentine's Day


Have you ever thought about Valentine's Day and not assumed everything to be red? Well at Cricut Cardz Challenge this week, the call is to made a card for this special day but using only blue, green and while ONLY. It kind of turns your thinking upside down doesn't it.

I started with the bird cage cut from a metallic blue/grey card stock using the Cricut Serenade cartridge. The song bird was also cut using the same cartridge. I had used some blue marble designer paper that I used as the backdrop for the card. The birdcage is sitting on a "ledge" made of white cardstock punched with a Fiskar's edge punch and stamped a line of hearts in blue ink. I also stamped the sentiment "i love YOU" inthe same blue ink. Small white hearts floating out from the birdcage were cut using the Cricut Wild Card cartridge. The finishing touch was to add a simple lime green satin ribbon to the top of the birdcage. Voila! A Valentine's Day card without using red can be done successfully.

Wednesday, January 12, 2011

Just Chillin'


The challenge this week at Cricut Cardz Challenge is to create a card using any cartridge or theme but using only red, black and white. My Create a Critter cartridge came to the rescue and as soon as I saw the penguin, my plan started to come together. On white cardstock I added a cranberry red background so that the black and white penguin and the igloo would stand out. I also added a little sparkle to it. My penguin friend is holding a flagpole out of black chenille pipe cleaner announcing that he is "Just Chillin'". I think in January this is exactly what everyone needs to do. Sit back after a hectic Christmas season and enjoy the sunshine and winter weather whether that be snowy or not. Pretty soon it will be Spring!

Stop over at Cricut Cardz Challenge and join us for Challenge #57. See you there.